OPEN-SOURCE SCRIPT
ที่อัปเดต: Momentum-Based Fair Value Gaps [BackQuant]
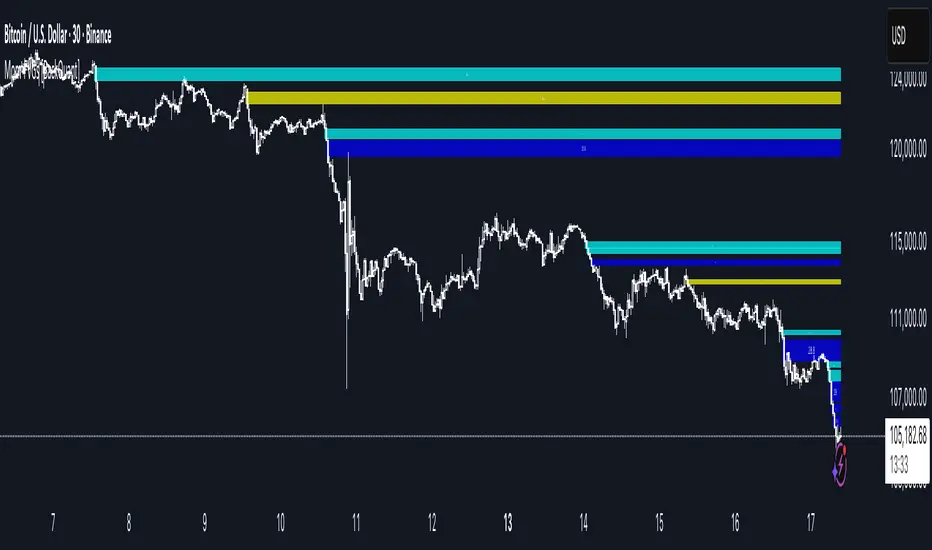
Momentum-Based Fair Value Gaps [BackQuant]
A precision tool that detects Fair Value Gaps and color-codes each zone by momentum, so you can quickly tell which imbalances matter, which are likely to fill, and which may power continuation.
What is a Fair Value Gap
A Fair Value Gap is a 3-candle price imbalance that forms when the middle candle expands fast enough that it leaves a void between candle 1 and candle 3.
Why add momentum
Not all gaps are equal. This script measures momentum with RSI on your chosen source and paints each FVG with a momentum heatmap. Strong-momentum gaps are more likely to hold or propel continuation. Weak-momentum gaps are more likely to fill.
Core Features
How it works
How to use it
Two trade playbooks
Key settings
Reading the chart
Workflow tips
Alerts included
Practical defaults
Notes
This tool does not predict the future. It maps imbalances and momentum so you can frame trades with clearer context, cleaner invalidation, and better ranking of which gaps matter. Use it with risk control and in combination with your broader process.
A precision tool that detects Fair Value Gaps and color-codes each zone by momentum, so you can quickly tell which imbalances matter, which are likely to fill, and which may power continuation.
What is a Fair Value Gap
A Fair Value Gap is a 3-candle price imbalance that forms when the middle candle expands fast enough that it leaves a void between candle 1 and candle 3.
- Bullish FVG: low[0] > high[2]. This marks a bullish imbalance left beneath price.
- Bearish FVG: high[0] < low[2]. This marks a bearish imbalance left above price.
- These zones often act as magnets for mean reversion or as fuel for trend continuation when price respects the gap boundary and runs.
Why add momentum
Not all gaps are equal. This script measures momentum with RSI on your chosen source and paints each FVG with a momentum heatmap. Strong-momentum gaps are more likely to hold or propel continuation. Weak-momentum gaps are more likely to fill.
Core Features
- Auto FVG Detection with size filters in percent of price.
- Momentum Heatmap per gap using RSI with smoothing. Multiple palettes: Gradient, Discrete, Simple, and scientific schemes like Viridis, Plasma, Inferno, Magma, Cividis, Turbo, Jet, plus Red-Green and Blue-White-Red.
- Bull and Bear Modes with independent toggles.
- Extend Until Filled: keep drawing live to the right until price fully fills the gap.
- Auto Remove Filled for a clean chart.
- Optional Labels showing the smoothed RSI value stored at the gap’s birth.
- RSI-based Filters: only accept bullish gaps when RSI is oversold and bearish gaps when RSI is overbought.
- Performance Controls: cap how many FVGs to keep on chart.
- Alerts: new bullish or bearish FVG, filled FVG, and extreme RSI FVGs.
How it works
- Source for Momentum: choose Returns, Close, or Volume.
Returns computes percent change over a short lookback to focus on impulse quality.
- RSI and Smoothing: RSI length and a small SMA smooth the signal to stabilize the color coding.
- Gap Scan: each bar checks for a 3-candle bullish or bearish imbalance that also clears your minimum size filter in percent of price.
- Heatmap Color: the gap is painted at creation with a color from your palette based on the smoothed RSI value, preserving the momentum signature that formed it.
- Lifecycle: if Extend Unfilled is on, the zone projects forward until price fully trades through the far edge. If Auto Remove is on, a filled gap is deleted immediately.
How to use it
- Scan for structure: turn on both bullish and bearish FVGs. Start with a moderate Min FVG Size percent to reduce noise. You will see stacked clusters in trends and scattered singletons in chop.
- Read the colors: brighter or stronger palette values imply stronger momentum at gap formation. Weakly colored gaps are lower conviction.
- Decide bias: bullish FVGs below price suggest demand footprints. Bearish FVGs above price suggest supply footprints. Use the heatmap and RSI value to rank importance.
- Choose your playbook:
Mean reversion: target partial or full fills of opposing FVGs that were created on weak momentum or that sit against higher timeframe context. - Trend continuation: look for price to respect the near edge of a strong-momentum FVG, then break away in the direction of the original impulse.
- Manage risk: in continuation ideas, invalidation often sits beyond the opposite edge of the active FVG. In reversion ideas, invalidation sits beyond the gap that should attract price.
Two trade playbooks
- Continuation - Buy the hold of a bullish FVG
- Context uptrend.
- A bullish FVG prints with strong RSI color.
- Price revisits the top of the gap, holds, and rotates up. Enter on hold or first higher low inside or just above the gap.
- Invalidation: below the gap bottom. Targets: prior swing, measured move, or next LV area.
- Reversion - Fade a weak bearish FVG toward fill
- Context range or fading trend.
- A bearish FVG prints with weak RSI color near a completed move.
- Price fails to accelerate lower and rotates back into the gap.
- Enter toward mid-gap with confirmation.
- Invalidation: above gap top. Target: opposite edge for a full fill, or the gap midline for partials.
Key settings
- Max FVG Display: memory cap to keep charts fast. Try 30 to 60 on intraday.
- Min FVG Size %: sets a quality floor. Start near 0.20 to 0.50 on liquid markets.
- RSI Length and Smooth: 14 and 3 are balanced. Increase length for higher timeframe stability.
- RSI Source:
- Returns: most sensitive to true momentum bursts
- Close: traditional.
- Volume: uses raw volume impulses to judge footprint strength.
- Filter by RSI Extremes: tighten rules so only the most stretched gaps print as signals.
- Heatmap Style and Palette: pick a palette with good contrast for your background. Gradient for continuous feel, Discrete for quick zoning, Simple for binary, Palette for scientific schemes.
- Extend Unfilled - Auto Remove: choose live projection and cleanup behavior to match your workflow.
Reading the chart
- Bullish zones sit beneath price. Respect and hold of the upper boundary suggests demand. Strong green or warm palette tones indicate impulse quality.
- Bearish zones sit above price. Respect and hold of the lower boundary suggests supply. Strong red or cool palette tones indicate impulse quality.
- Stacking: multiple same-direction gaps stacked in a trend create ladders. Ladders often act as stepping stones for continuation.
- Overlapping: opposing gaps overlapping in a small region usually mark a battle zone. Expect chop until one side is absorbed.
Workflow tips
- Map higher timeframe trend first. Use lower timeframe FVGs for entries aligned with the higher timeframe bias.
- Increase Min FVG Size percent and RSI length for noisy symbols.
- Use labels when learning to correlate the RSI numbers with your palette colors.
- Combine with VWAP or moving averages for confluence at FVG edges.
- If you see repeated fills and refills of the same zone, treat that area as fair value and avoid chasing.
Alerts included
- New Bullish FVG
- New Bearish FVG
- Bullish FVG Filled
- Bearish FVG Filled
- Extreme Oversold FVG - bullish
- Extreme Overbought FVG - bearish
Practical defaults
- RSI Length 14, Smooth 3, Source Returns.
- Min FVG Size 0.25 percent on liquid majors.
- Heatmap Style Gradient, Palette Viridis or Turbo for contrast.
- Extend Unfilled on, Auto Remove on for a clean live map.
Notes
This tool does not predict the future. It maps imbalances and momentum so you can frame trades with clearer context, cleaner invalidation, and better ranking of which gaps matter. Use it with risk control and in combination with your broader process.
เอกสารเผยแพร่
Alert updateเอกสารเผยแพร่
small fixสคริปต์โอเพนซอร์ซ
ด้วยเจตนารมณ์หลักของ TradingView ผู้สร้างสคริปต์นี้ได้ทำให้เป็นโอเพนซอร์ส เพื่อให้เทรดเดอร์สามารถตรวจสอบและยืนยันฟังก์ชันการทำงานของมันได้ ขอชื่นชมผู้เขียน! แม้ว่าคุณจะใช้งานได้ฟรี แต่โปรดจำไว้ว่าการเผยแพร่โค้ดซ้ำจะต้องเป็นไปตาม กฎระเบียบการใช้งาน ของเรา
Check out whop.com/signals-suite for Access to Invite Only Scripts!
Or go to backquant.com/
Or go to backquant.com/
คำจำกัดสิทธิ์ความรับผิดชอบ
ข้อมูลและบทความไม่ได้มีวัตถุประสงค์เพื่อก่อให้เกิดกิจกรรมทางการเงิน, การลงทุน, การซื้อขาย, ข้อเสนอแนะ หรือคำแนะนำประเภทอื่น ๆ ที่ให้หรือรับรองโดย TradingView อ่านเพิ่มเติมใน ข้อกำหนดการใช้งาน
สคริปต์โอเพนซอร์ซ
ด้วยเจตนารมณ์หลักของ TradingView ผู้สร้างสคริปต์นี้ได้ทำให้เป็นโอเพนซอร์ส เพื่อให้เทรดเดอร์สามารถตรวจสอบและยืนยันฟังก์ชันการทำงานของมันได้ ขอชื่นชมผู้เขียน! แม้ว่าคุณจะใช้งานได้ฟรี แต่โปรดจำไว้ว่าการเผยแพร่โค้ดซ้ำจะต้องเป็นไปตาม กฎระเบียบการใช้งาน ของเรา
Check out whop.com/signals-suite for Access to Invite Only Scripts!
Or go to backquant.com/
Or go to backquant.com/
คำจำกัดสิทธิ์ความรับผิดชอบ
ข้อมูลและบทความไม่ได้มีวัตถุประสงค์เพื่อก่อให้เกิดกิจกรรมทางการเงิน, การลงทุน, การซื้อขาย, ข้อเสนอแนะ หรือคำแนะนำประเภทอื่น ๆ ที่ให้หรือรับรองโดย TradingView อ่านเพิ่มเติมใน ข้อกำหนดการใช้งาน