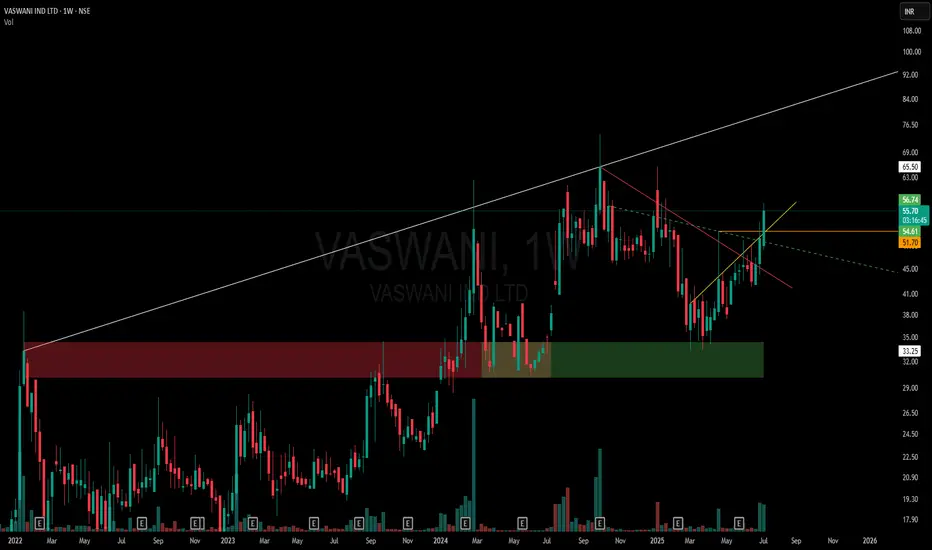
🔹 White Line: Captures the expanding higher-high resistance zone — part of the broader one-sided broadening pattern. Each new high is breaching the prior, giving the top side its expanding identity.
🔹 Horizontal Zone (Red to Green Shift): What once acted as a strong supply zone now flipped to a demand zone — price has respected this region multiple times, marking its evolution.
🔹 Red Line: A clean Counter-Trendline (CT) containing multiple touches, recently broken.
🔹 Yellow Line: A hidden diagonal resistance — tight and respected — offering another layer of confluence.
🔹 Green Dotted Line: Subtle hidden support built over time — watch how the structure was reacting along this line.
🔹 Orange Line: Marks wick-based rejection from a recent swing — subtle but clear evidence of supply exhaustion on that specific level.
🧠 This chart is not about predictions — it's about how beautifully price respects structure when drawn with logic and precision. Just charting. Just behavior. Just price.
🎯 Master My Self-Made Trading Strategy
📈 Telegram (Learn Today): t.me/hashtaghammer
✅ WhatsApp (Learn Today): wa.me/919455664601
📈 Telegram (Learn Today): t.me/hashtaghammer
✅ WhatsApp (Learn Today): wa.me/919455664601
การนำเสนอที่เกี่ยวข้อง
คำจำกัดสิทธิ์ความรับผิดชอบ
ข้อมูลและบทความไม่ได้มีวัตถุประสงค์เพื่อก่อให้เกิดกิจกรรมทางการเงิน, การลงทุน, การซื้อขาย, ข้อเสนอแนะ หรือคำแนะนำประเภทอื่น ๆ ที่ให้หรือรับรองโดย TradingView อ่านเพิ่มเติมใน ข้อกำหนดการใช้งาน