PROTECTED SOURCE SCRIPT
EMA Dual Clouds
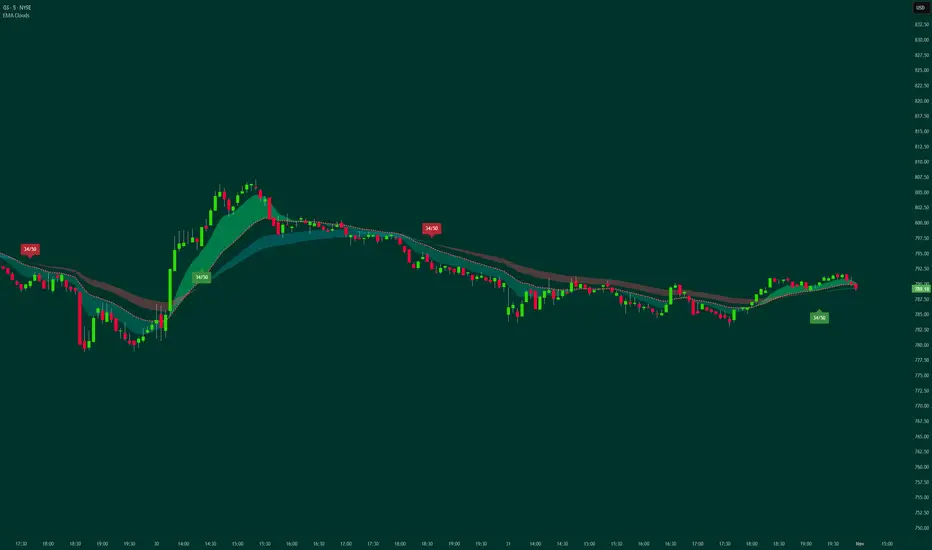
EMA Clouds - Enhanced Version
Description
This indicator provides a sophisticated dual-cloud exponential moving average system with extensive customization options and intelligent crossover detection. Building upon the classic EMA cloud concept, this enhanced version offers complete control over two independent cloud pairs (fast and slow), each with adjustable EMA periods, individual line toggles, custom colors, and automated crossover signals with dynamic labels. Unlike basic EMA overlays, this tool creates visual zones between moving average pairs that change color based on trend direction, making it easy to identify bullish and bearish conditions at a glance while providing flexibility to adapt to any trading style or timeframe.
Advanced Feature: By setting the same EMA period for Cloud 1's second EMA and Cloud 2's first EMA, you can create a unified three-EMA cloud system (e.g., 8/21/50), where both clouds share a middle EMA, creating layered zones that provide graduated trend strength visualization.
How It Works
The indicator calculates four exponential moving averages and creates two distinct "clouds" by filling the space between EMA pairs. Each cloud serves a different purpose:
Cloud 1 (Fast Cloud) - Default 8/21 EMAs:
Uses shorter-period EMAs for quick trend identification
Changes color when the fast EMA crosses the slow EMA
Ideal for entry signals and short-term trend confirmation
Bullish when fast EMA > slow EMA (default: lime cloud)
Bearish when fast EMA < slow EMA (default: teal cloud)
Cloud 2 (Slow Cloud) - Default 34/50 EMAs:
Uses longer-period EMAs for overall trend direction
Provides broader market context and trend confirmation
Better for filtering false signals and identifying major trends
Bullish when fast EMA > slow EMA (default: aqua cloud)
Bearish when fast EMA < slow EMA (default: blue cloud)
Three-EMA Cloud Configuration:
You can configure the indicator to create a three-level EMA system by setting EMA 2 and EMA 3 to the same period. For example:
EMA 1: 8
EMA 2: 21
EMA 3: 21 (same as EMA 2)
EMA 4: 50
This creates:
Cloud 1: Between 8 and 21 (short-term trend)
Cloud 2: Between 21 and 50 (medium-term trend)
Both clouds share the middle EMA (21), creating a layered visual effect that shows:
Innermost cloud (8-21): Immediate price action relative to short-term trend
Outer cloud (21-50): Broader trend context
When both clouds are the same color = strong trend
When clouds are different colors = transitional phase
Crossover Signal System:
When the fast EMA crosses above or below the slow EMA within each cloud pair, the indicator:
Plots a triangle marker (up for bullish, down for bearish)
Displays a label showing the EMA periods used (e.g., "8/21")
Triggers an alert condition (if configured)
Uses percentage-based vertical offset to position labels away from price action
Original Features & Methodology
What Makes This Script Unique:
Dual independent cloud systems that can be toggled, customized, and analyzed separately
Flexible three-EMA configuration by sharing a middle EMA between both clouds
Individual control over each of the four EMA lines (show/hide each independently)
Separate color customization for bullish and bearish states of each cloud
Smart label system with percentage-based vertical offset that adapts to any price scale
Independent signal toggles for each cloud (control crossover signals separately)
Complete color palette control for both cloud fills and crossover signal labels
Dynamic alert messages that include the actual EMA periods being monitored
Technical Implementation:
EMAs calculated using Pine Script's built-in ta.ema() function for accuracy
Cloud fills use the fill() function with conditional coloring based on EMA relationship
Crossover detection uses ta.crossover() and ta.crossunder() for precise signal timing
Label positioning uses percentage-based offset from high/low for consistent placement across instruments
All settings organized into logical groups for intuitive navigation
No repainting - all signals confirmed on bar close
EMA Cloud Interpretation:
The thickness of each cloud represents the "strength" of the trend:
Thick clouds = EMAs are far apart = strong trending conditions
Thin clouds = EMAs are close together = weak trend or potential reversal
Cloud color change = Trend direction shift = potential entry/exit point
Key Features
🔹 Dual Cloud System: Two independent EMA cloud pairs for multi-timeframe analysis
🔹 Three-EMA Mode: Share middle EMA between clouds for layered visualization
🔹 Complete Customization: Adjust all four EMA periods to match your trading strategy
🔹 Individual EMA Toggles: Show/hide each of the four EMA lines independently
🔹 Custom Line Colors: Define unique colors for each EMA line
🔹 Cloud Color Control: Separate bullish and bearish colors for each cloud
🔹 Line Width Settings: Adjust EMA line thickness for each cloud pair
🔹 Crossover Signals: Triangle markers at all EMA crossover points
🔹 Smart Signal Labels: Display EMA periods with adjustable vertical offset
🔹 Independent Signal Control: Toggle crossover signals for each cloud separately
🔹 Full Label Customization: Control size, colors, and text colors for bullish/bearish labels
🔹 Built-in Alerts: Alert conditions for all four crossover types
🔹 Organized Settings: All inputs grouped logically for easy configuration
Input Parameters Explained
Cloud 1 (Fast) Settings
Show Cloud 1: Toggle the fast cloud fill on/off
EMA 1 Length: Period for first EMA (default: 8)
EMA 2 Length: Period for second EMA (default: 21) - Set equal to EMA 3 for three-EMA mode
Show EMA Lines: Individual toggles for each line
EMA Colors: Custom color for each line
Line Width: Thickness from 1-5 pixels (default: 2)
Bullish Cloud Color: Fill color when EMA 1 > EMA 2 (default: lime with 60% transparency)
Bearish Cloud Color: Fill color when EMA 1 < EMA 2 (default: teal with 60% transparency)
Cloud 2 (Slow) Settings
Show Cloud 2: Toggle the slow cloud fill on/off
EMA 3 Length: Period for third EMA (default: 34) - Set equal to EMA 2 for three-EMA mode
EMA 4 Length: Period for fourth EMA (default: 50)
Show EMA Lines: Individual toggles for each line
EMA Colors: Custom color for each line
Line Width: Thickness from 1-5 pixels (default: 2)
Bullish Cloud Color: Fill color when EMA 3 > EMA 4 (default: aqua with 60% transparency)
Bearish Cloud Color: Fill color when EMA 3 < EMA 4 (default: blue with 60% transparency)
Crossover Signal Settings
Show Crossover Signals: Master toggle for all crossover markers
Show Cloud 1 Crossover Signals: Toggle fast cloud signals
Show Cloud 2 Crossover Signals: Toggle slow cloud signals
Cloud 1 Signal Label Settings
Show Cloud 1 Labels: Display period labels on Cloud 1 crossovers
Cloud 1 Label Size: Choose from Tiny to Huge
Cloud 1 Label Vertical Offset: Distance from price bars as percentage (0.15% default)
Bullish Label Color: Background color for bullish crossover labels (default: green)
Bullish Text Color: Text color for bullish labels (default: white)
Bearish Label Color: Background color for bearish crossover labels (default: red)
Bearish Text Color: Text color for bearish labels (default: white)
Cloud 2 Signal Label Settings
Show Cloud 2 Labels: Display period labels on Cloud 2 crossovers
Cloud 2 Label Size: Choose from Tiny to Huge
Cloud 2 Label Vertical Offset: Distance from price bars as percentage (0.15% default)
Bullish Label Color: Background color for bullish crossover labels (default: lime)
Bullish Text Color: Text color for bullish labels (default: white)
Bearish Label Color: Background color for bearish crossover labels (default: maroon)
Bearish Text Color: Text color for bearish labels (default: white)
How to Use This Indicator
Basic Setup:
Add the indicator to your chart - both clouds will appear with default settings
Cloud 1 (8/21) shows fast trend changes in lime/teal
Cloud 2 (34/50) shows broader trend in aqua/blue
Triangle markers appear when EMAs cross
Three-EMA Cloud Setup:
Set EMA 2 Length to your middle period (e.g., 21)
Set EMA 3 Length to the same value (e.g., 21)
Now you have: EMA 1 (8) - Cloud 1 - EMA 2/3 (21) - Cloud 2 - EMA 4 (50)
This creates layered zones: inner cloud for short-term, outer cloud for medium-term
Optionally hide EMA 2 or EMA 3 line to show only one shared middle line
Reading the Clouds:
Both clouds same color = Strong trend confirmation (both timeframes aligned)
Clouds opposite colors = Mixed signals or potential reversal zone
Cloud 1 changes first = Early warning of potential trend change
Cloud 2 confirms = Stronger trend change signal
Thick clouds = Strong trending market
Thin clouds = Weak trend, be cautious with entries
Three-EMA Cloud Reading:
Both clouds same color = Price is on correct side of all EMAs (strongest signal)
Inner cloud changes = Short-term trend shift
Outer cloud still intact = Major trend still valid
Both clouds change = Complete trend reversal
Layered visual = Easy to see how far price is from each EMA level
Trading Strategies:
Scalping/Day Trading (Fast Signals):
Use Cloud 1 (8/21) for primary signals
Enter when Cloud 1 changes color
Use Cloud 2 as trend filter (only trade in direction of Cloud 2)
Exit when Cloud 1 changes back or price hits target
Swing Trading (Confirmed Signals):
Wait for both clouds to align (same color)
Enter when Cloud 2 changes color with Cloud 1 confirmation
Hold until Cloud 2 changes back
Use Cloud 1 for position management and partial exits
Trend Following:
Only trade when both clouds are same color
Enter on Cloud 1 crossovers in direction of Cloud 2
Exit only when Cloud 2 changes color
Ignore Cloud 1 signals against Cloud 2 trend
Three-EMA Strategy:
Configure as 8/21/50 (set EMA 2 and EMA 3 both to 21)
Strong entries: Both clouds same color (price beyond all EMAs)
Early exits: Inner cloud changes (take profits)
Stop loss: Outer cloud changes (trend reversal)
Re-entry: Wait for both clouds to realign
Custom Configurations:
Standard Two-Cloud:
Aggressive: 5/13 and 21/34 for faster signals
Balanced: 8/21 and 34/50 (default)
Conservative: 13/34 and 50/100 for stronger confirmation
Ichimoku style: 9/26 and 26/52 for similar methodology
Three-EMA Configurations:
Fast: Set EMAs to 5, 13, 13, 34 (5/13/34 system)
Standard: Set EMAs to 8, 21, 21, 50 (8/21/50 system)
Slow: Set EMAs to 13, 34, 34, 100 (13/34/100 system)
Fibonacci: Set EMAs to 8, 21, 21, 89 (Fibonacci sequence)
Classic: Set EMAs to 10, 20, 20, 50 (round numbers)
Customization Tips:
Hide EMA lines to see only clouds for cleaner charts
In three-EMA mode, hide either EMA 2 or EMA 3 to show only one middle line
Adjust cloud transparency (60% default) if colors are too intense
Use different colors to distinguish multiple chart windows
Increase label offset if labels overlap with price action
Turn off Cloud 1 signals in ranging markets to reduce noise
Use larger label sizes on multi-monitor setups
In three-EMA mode, use contrasting colors for inner and outer clouds
Alert Configuration:
Set up alerts for:
Cloud 1 Bullish Cross - Fast trend up signal
Cloud 1 Bearish Cross - Fast trend down signal
Cloud 2 Bullish Cross - Major trend up confirmation
Cloud 2 Bearish Cross - Major trend down confirmation
Use Cases
Intraday Trading:
Quick trend identification with Cloud 1
Major trend filter with Cloud 2
Clear visual entry/exit zones
Label offset prevents chart clutter on busy timeframes
Three-EMA mode shows graduated support/resistance zones
Swing Trading:
Multi-timeframe trend analysis on single chart
Both clouds must align for high-probability setups
Cloud thickness indicates trend strength
Position management using Cloud 1 signals
Three-EMA setup provides clear profit-taking levels
Trend Following:
Clear visual representation of trend direction
Cloud color = trade direction
Thick clouds = add to positions
Thin clouds = prepare for exit
Three-EMA layers show trend progression
Market Analysis:
Quick assessment of market conditions
Multiple timeframes visible simultaneously
Color-coded for instant interpretation
Works on all asset classes
Three-EMA configuration shows price relationship to multiple timeframe EMAs
Technical Details
Uses standard EMA calculation: ta.ema(source, length)
Crossover detection with no lag: ta.crossover() and ta.crossunder()
Percentage-based label offset works across all price scales
All calculations confirmed on bar close (no repainting)
Compatible with all timeframes and instruments
Efficient code with minimal computation overhead
Works on stocks, forex, crypto, futures, and indices
Three-EMA mode achieved by setting EMA 2 and EMA 3 to same value
Best Practices
Start with default settings and adjust based on your instrument's volatility
Use shorter periods for faster markets, longer for slower markets
Try three-EMA configuration (8/21/50) for clearer trend visualization
Consider higher timeframe clouds as filters for lower timeframe entries
Don't ignore Cloud 2 signals - they're often more reliable
Combine with volume analysis for stronger confirmation
Watch for cloud thickness changes as early warning signals
Use cloud color alignment for highest-probability setups
Adjust transparency if clouds obscure price action
Test different EMA combinations to find what works for your strategy
Set alerts for both clouds to catch all opportunities
In three-EMA mode, treat inner cloud as entry zone and outer cloud as trend filter
This indicator transforms the traditional EMA crossover system into a visual, intuitive tool that makes trend identification effortless while providing the flexibility to adapt to any trading style or market condition. The optional three-EMA configuration adds another dimension of trend analysis by creating layered zones that show price position relative to multiple timeframe perspectives simultaneously.
Connect With Me
📧 Email: contact@savvytraderpro.com
📊 Website: savvytraderpro.com
🐦 X (Twitter): savvytraderpro
💬 Follow for more indicators, trading strategies, and market insights!
⚠️ Disclaimer:
This script is provided for educational and informational purposes only. It is not financial advice and should not be considered a recommendation to buy, sell, or hold any financial instrument. Trading involves significant risk of loss and is not suitable for every investor. Users should perform their own due diligence and consult with a licensed financial advisor before making any trading decisions. The author does not guarantee any profits or results from using this script, and assumes no liability for any losses incurred. Use this script at your own risk.
สคริปต์ที่ได้รับการป้องกัน
สคริปต์นี้ถูกเผยแพร่เป็นแบบ closed-source อย่างไรก็ตาม คุณสามารถใช้ได้อย่างอิสระและไม่มีข้อจำกัดใดๆ – เรียนรู้เพิ่มเติมได้ที่นี่
คำจำกัดสิทธิ์ความรับผิดชอบ
ข้อมูลและบทความไม่ได้มีวัตถุประสงค์เพื่อก่อให้เกิดกิจกรรมทางการเงิน, การลงทุน, การซื้อขาย, ข้อเสนอแนะ หรือคำแนะนำประเภทอื่น ๆ ที่ให้หรือรับรองโดย TradingView อ่านเพิ่มเติมที่ ข้อกำหนดการใช้งาน