SuperTrend AI Oscillator StrategySuperTrend AI Oscillator Strategy
Overview
This strategy is a trend-following approach that combines the SuperTrend indicator with oscillator-based filtering.
By identifying market trends while utilizing oscillator-based momentum analysis, it aims to improve entry precision.
Additionally, it incorporates a trailing stop to strengthen risk management while maximizing profits.
This strategy can be applied to various markets, including Forex, Crypto, and Stocks, as well as different timeframes. However, its effectiveness varies depending on market conditions, so thorough testing is required.
Features
1️⃣ Trend Identification Using SuperTrend
The SuperTrend indicator (a volatility-adjusted trend indicator based on ATR) is used to determine trend direction.
A long entry is considered when SuperTrend turns bullish.
A short entry is considered when SuperTrend turns bearish.
The goal is to capture clear trend reversals and avoid unnecessary trades in ranging markets.
2️⃣ Entry Filtering with an Oscillator
The Super Oscillator is used to filter entry signals.
If the oscillator exceeds 50, it strengthens long entries (indicating strong bullish momentum).
If the oscillator drops below 50, it strengthens short entries (indicating strong bearish momentum).
This filter helps reduce trades in uncertain market conditions and improves entry accuracy.
3️⃣ Risk Management with a Trailing Stop
Instead of a fixed stop loss, a SuperTrend-based trailing stop is implemented.
The stop level adjusts automatically based on market volatility.
This allows profits to run while managing downside risk effectively.
4️⃣ Adjustable Risk-Reward Ratio
The default risk-reward ratio is set at 1:2.
Example: A 1% stop loss corresponds to a 2% take profit target.
The ratio can be customized according to the trader’s risk tolerance.
5️⃣ Clear Trade Signals & Visual Support
Green "BUY" labels indicate long entry signals.
Red "SELL" labels indicate short entry signals.
The Super Oscillator is plotted in a separate subwindow to visually assess trend strength.
A real-time trailing stop is displayed to support exit strategies.
These visual aids make it easier to identify entry and exit points.
Trading Parameters & Considerations
Initial Account Balance: Default is $7,000 (adjustable).
Base Currency: USD
Order Size: 10,000 USD
Pyramiding: 1
Trading Fees: $0.94 per trade
Long Position Margin: 50%
Short Position Margin: 50%
Total Trades (M5 Timeframe): 1,032
Visual Aids for Clarity
This strategy includes clear visual trade signals to enhance decision-making:
Green "BUY" labels for long entries
Red "SELL" labels for short entries
Super Oscillator plotted in a subwindow with a 50 midline
Dynamic trailing stop displayed for real-time trend tracking
These visual aids allow traders to quickly identify trade setups and manage positions with greater confidence.
Summary
The SuperTrend AI Oscillator Strategy is developed based on indicators from Black Cat and LuxAlgo.
By integrating high-precision trend analysis with AI-based oscillator filtering, it provides a strong risk-managed trading approach.
Important Notes
This strategy does not guarantee profits—performance varies based on market conditions.
Past performance does not guarantee future results. Markets are constantly changing.
Always test extensively with backtesting and demo trading before using it in live markets.
Risk management, position sizing, and market conditions should always be considered when trading.
Conclusion
This strategy combines trend analysis with momentum filtering, enhancing risk management in trading.
By following market trends carefully, making precise entries, and using trailing stops, it seeks to reduce risk while maximizing potential profits.
Before using this strategy, be sure to test it thoroughly via backtesting and demo trading, and adjust the settings to match your trading style.
ค้นหาในสคริปต์สำหรับ "luxalgo"

Advanced Order Blocks by AccountantXThe "Advanced Order Blocks by AccountantX" is tool designed to identify and visualize significant order blocks in the market.
This script goes beyond traditional order block detection by integrating advanced features such as volume threshold filtering, ATR-based sizing, and higher timeframe considerations.
How It works:
A. General data :
- Order Block Detection: Identifies bullish and bearish order blocks based on swing highs and lows, with options to filter by volume thresholds to ensure significant levels.
- Volume Threshold: Only displays order blocks where the volume exceeds a user-defined threshold, ensuring the highlighted zones are of particular significance.
- ATR-Based Sizing: Offers the option to use the Average True Range (ATR) for sizing order blocks, allowing for dynamic adjustment based on market volatility.
- Higher Timeframe Integration: Includes the ability to display order blocks from a higher timeframe, providing a broader market perspective.
- Customizable Appearance: Users can customize the colors and transparency of the order blocks, ensuring they fit seamlessly with any chart setup.
B. Code explanation :
- The script allows you to set a minimum volume threshold. Order blocks are only shown if the volume during their formation exceeds this threshold, ensuring that only significant price levels are highlighted.
- When enabled, the ATR (Average True Range) is used to size the order blocks. This means the height of the blocks adjusts dynamically with market volatility, providing a more accurate representation of significant zones.
- The script can display order blocks from a higher timeframe on your current chart. This is useful for aligning shorter-term trading decisions with broader market trends.
C. How to Use:
a) Set the volume threshold to filter out less significant order blocks. Adjust the value according to the typical volume of your trading instrument;
b) Enable the ATR-based sizing and set the period and multiplier to match your trading style. This helps in identifying order blocks relative to market volatility;
c) Choose a higher timeframe if you want to see significant order blocks from a broader market perspective. This can help in making more informed trading decisions.
Acknowledgements:
This script builds upon traditional order block concepts by integrating advanced features and customization options. Special thanks to the TradingView community( @fluxchart, @LuxAlgo_Team) for providing foundational concepts and inspiration.
Important Note
This script is provided as-is for educational purposes.

Predictive Channel SignalsThis script is a comprehensive tool designed to enhance trading strategies by utilizing predictive channels, multiple moving average types, and dynamic signal generation. The script is meticulously crafted for traders who seek to identify potential support and resistance levels, anticipate market reversals, and optimize entry and exit points through advanced technical analysis featuring with the help of codes provided by LuxAlgo.
Core Features:
Dynamic Predictive Channels: The script calculates predictive channels based on price movements and volatility, represented by adjustable factors for sensitivity and slope. These channels adapt to changing market conditions, providing real-time support and resistance levels.
Versatile Moving Averages: Users can select from a variety of moving average types, including SMA, EMA, SMMA (RMA), HullMA, WMA, VWMA, DEMA, and TEMA. This flexibility allows traders to tailor the analysis to their specific strategy and market view.
Signal Generation: The script generates buying and selling signals based on the interaction between moving averages and predictive channels. Signals are categorized into low, mid, and high tiers, indicating the strength and potential risk/reward of the trade opportunity.
Visual Cues and Customization: With an emphasis on usability, the script offers customizable color schemes for easy interpretation of bullish and bearish zones, moving averages, and trading signals. Traders can quickly identify market trends and reversal points at a glance.
Advanced Calculations: Utilizing calculations such as the Average True Range (ATR) for volatility assessment, the script ensures that signals are both sensitive to market dynamics and robust against false positives.
Ideal for Traders Who:
Prefer a technical analysis approach with a focus on moving averages and price channels.
Desire a customizable tool that can adapt to different trading styles and market conditions.
Seek to enhance their trading strategy with predictive insights and actionable signals.
Circle = Entry Point
End of polyline = Stop Loss
1 Circle = Low Strength
2 Circles = Mid Strength
3 Circles = High Strength

Volume Profile HeatmapA variation of a Volume Profile based on code originally by LuxAlgo. () The traditional bar chart is replaced with full-width bars that are brighter for high volume price levels.
Like a traditional VP, its purpose is to visualize how volume corresponds to specific price levels, allowing you to get a quick idea of where the most activity is occurring, and where it hasn't been. This information may provide clues as to where price action may return, areas of support and resistance , and regions where price may move quickly. The basic concepts behind any Volume Profile (or Price by Volume Chart) should apply here as well. (investopedia article)
Inputs are set up such that you can customize the lookback period, number of rows, and width of rows for most major timeframes individually. Timeframes between those available will use the next lower timeframe settings (e.g., 2m chart will use the 1m settings.)
This indicator is experimental and is likely to receive further updates.

All in One Trend Indicator by Nicks**Multi-Factor Confluence Suite (7-in-1 Overlay)**
### **Description:**
**Overview**
This script is a comprehensive workspace optimizer designed to combine 7 essential trading tools into a single, efficient overlay. By merging trend analysis, market structure, liquidity zones, and momentum signals, this tool allows traders to bypass the standard indicator limit and view high-probability confluence setups without a cluttered chart.
**Key Features & Functionality**
* **Trend Filtering (Hull Suite):**
* A lag-reduced moving average system that visualizes the macro trend.
* Includes candle coloring options to easily identify trend alignment.
* **Market Structure (SMC):**
* Automatically maps Break of Structure (BOS) and Change of Character (CHoCH).
* Identifies Order Blocks and Fair Value Gaps (FVG) for potential entry/exit zones.
* **Liquidity Analysis:**
* **Swings:** Highlights key swing highs and lows where stop losses typically reside.
* **Grabs:** Specifically detects "stop hunts" where price wicks liquidity before reversing (Bubbles visualization).
* **Momentum Signals (UT Bot & MACD):**
* **UT Bot:** Provides high-sensitivity Buy/Sell labels based on ATR trailing stops.
* **MACD Overlay:** Plots signal crossovers directly on the price chart (arrows) to identify momentum shifts without occupying a separate oscillator pane.
* **Session Timing:**
* Visualizes major trading sessions (NY, London, Tokyo, Sydney) with an optional dashboard table.
**How to Use**
This suite is designed for "Confluence Trading."
1. **Identify Trend:** Use the Hull Suite color to determine the directional bias.
2. **Find Structure:** Wait for price to react at an SMC Order Block or Liquidity Zone.
3. **Confirm Entry:** Look for a UT Bot label or MACD Arrow in the direction of the trend.
**Settings**
Each module is separated by headers in the settings menu. You can toggle specific indicators on/off to suit your trading style and keep the chart clean.
**Credits & Attribution**
This script is a compilation of open-source logic from the TradingView community, adapted and updated to Pine Script v5/v6 for compatibility. Special thanks to the original authors for their foundational work:
* *InSilico* (Hull Logic)
* *LuxAlgo* (SMC & Liquidity Swings Logic)
* *Flux Charts* (Liquidity Grabs Logic)
* *QuantNomad* (UT Bot Logic)
* *TraderHariKrishna* (Session Logic)
**License**
This source code is subject to the terms of the Mozilla Public License 2.0 and/or Creative Commons (CC BY-NC-SA 4.0) where applicable by the original authors. This script is intended for educational and personal use.
---

Delta Flow Profile [Ham]Variation of LuxAlgo original. The "Show Values" options allows you to turn off volume values printed on each bar. Also increased number of rows available

A+ ORB VWAP EMA Alerts//@version=5
indicator("A+ ORB VWAP EMA Alerts", overlay = true)
// ORB levels (set these from LuxAlgo each morning)
orbHigh = input.float(0.0, "ORB High", step = 0.1)
orbLow = input.float(0.0, "ORB Low", step = 0.1)
// EMAs and VWAP
emaFast = ta.ema(close, 9)
emaSlow = ta.ema(close, 21)
vwapVal = ta.vwap(hlc3)
// Conditions
longCond = (close > orbHigh) and (close > vwapVal) and (emaFast > emaSlow)
shortCond = (close < orbLow) and (close < vwapVal) and (emaFast < emaSlow)
// Alerts (single-line, plain ASCII)
alertcondition(longCond, "A+ LONG SETUP ORB VWAP EMA", "A+ LONG: ORB High accepted, above VWAP, EMA9 > EMA21 (5m close).")
alertcondition(shortCond, "A+ SHORT SETUP ORB VWAP EMA", "A+ SHORT: ORB Low accepted, below VWAP, EMA9 < EMA21 (5m close).")

FVG Candle - Auto Threshold + MitigationFVG Candle (MTF) is a clean and lightweight Fair Value Gap indicator designed for traders who want a structured and non-repainting view of imbalance zones across timeframes.
This script focuses on clarity, mitigation logic, and multi-timeframe consistency, making it suitable for discretionary trading and market structure analysis.
🔹 Key Features
Detects Bullish and Bearish Fair Value Gaps
Multi-Timeframe (MTF) FVG detection
Automatic volatility-based threshold
Split-box visualization for clearer imbalance structure
Automatic mitigation detection and cleanup
Optional bar-based extension
Built-in alerts for new FVG formation
Non-repainting by default
🔹 What Makes This Script Different
Uses a controlled MTF workflow to avoid unnecessary repainting
Automatically removes mitigated gaps to keep the chart clean
Visual split of FVG zones improves precision when interacting with price
Designed to be lightweight and readable, avoiding chart clutter
🔹 Repainting Notice
By default, this script does NOT repaint.
An optional repainting mode is available for study and visualization purposes only.
When enabled, historical FVGs may adjust as higher timeframe candles complete.
🔹 How to Use
Use FVGs as reaction zones, not direct entry signals
Combine with market structure, liquidity, or volume
Bullish FVGs may act as demand zones
Bearish FVGs may act as supply zones
Mitigated FVGs are automatically removed
🔹 Credits
The Fair Value Gap concept and core detection logic are inspired by
Smart Money Concepts .
This script is distributed under the CC BY-NC-SA 4.0 license, with proper attribution.

AI Adaptive Trend Navigator Strategy Echo EditionAI Adaptive Trend Navigator Strategy
This is a professional long-only automated strategy optimized for Taiwan Index Futures (TX). Based on the LuxAlgo clustering framework, this version features advanced logic iteration for institutional-grade backtesting and execution.
1. Realistic Cost Modeling To ensure backtest reliability, this strategy is pre-configured with:
Slippage: 2 ticks (Approx. 400 TWD per side).
Commission: 100 TWD per side.
Total Cost: 500 TWD per side. This provides a rigorous stress test for real-world trading environments.
2. State Consistency & Logic Continuity Optimized the underlying array handling to ensure "State Persistence." This eliminates the logic gaps common in real-time script execution, ensuring that historical signals are 100% consistent with live alerts.
3. Adaptive AI Clustering Utilizes K-means clustering to dynamically select the optimal ATR factors based on current market volatility, allowing the strategy to "evolve" as market regimes shift.
🧠 開發理念:追求實戰一致性的量化策略 本策略旨在為台指期(TX)提供一套具備真實參考價值的自動化系統。
✨ Echo 版核心優化點
數據連續性迭代:修正底層邏輯,確保訊號在即時盤勢中穩定不跳斷。
真實交易成本模擬:預設 2 點滑價 與 單邊 100 TWD 手續費,單邊總成本對標 500 TWD,拒絕虛假神單,挑戰最嚴苛的回測環境。
台指期專屬參數調校:融入針對台灣市場波動特性的預設參數與過濾邏輯。
🛡️ 進階實戰過濾
空間緩衝區 (Buffer Strategy):價格需有效突破緩衝區才觸發,精準過濾盤整雜訊。
AI 信心評分系統:只有當動能穩定度達標時才會發進場訊號。
冷卻保護機制:有效抑制訊號在洗盤區間過度頻繁跳動。
⚠️ Disclaimer: Backtest results do not guarantee future performance.

AI Adaptive Trend Navigator Echo EditionAI Adaptive Trend Navigator
This is an advanced trend-following system optimized for high-volatility index futures (TX). Built upon the LuxAlgo clustering framework, this version introduces several critical enhancements to meet professional trading standards:
1. State Consistency Iteration Enhanced the underlying logic for dynamic arrays and User-Defined Types (UDTs) to ensure stable "State Persistence." This fix eliminates logic gaps during real-time price fluctuations, ensuring that historical backtests perfectly align with live execution.
2. Adaptive Factor Tuning (K-means) The system simulates dozens of parameter paths in real-time, using K-means clustering to automatically select the optimal factor suited for the current market volatility.
3. Advanced Practical Filters
Dynamic Buffer Strategy: Filters out market noise during consolidation and early session volatility.
Confidence Threshold: Only triggers signals when the AI performance score meets the required quality.
Cooldown Logic: Prevents rapid signal flipping in choppy markets.
🧠 開發理念:將 AI 自適應力帶入台指期實戰 針對台指期(TX)高波動特性開發,透過機器學習演算法動態尋優,解決傳統指標參數固定的滯後性。
✨ Echo 版核心優化點
數據連續性迭代:底層邏輯優化,確保訊號在即時盤勢中穩定不跳斷,回測與實戰高度吻合。
自適應動態尋優:透過 K-means 聚類自動鎖定當前最佳 ATR 因子。
實戰多重濾網:包含空間緩衝區 (Buffer) 與信心門檻,大幅提升訊號品質。
📊 視覺說明
🚀 Rocket: AI confirms trend momentum.
⚡ Lightning: Trend exhaustion or reversal warning.
⚠️ Disclaimer: For educational and technical analysis purposes only.

PK_Volume Delta Candles [LuxAlgo]The inside candle colour where the candle color and delta are opposite, has been converted into yellow color.

SMC + Dual UT Bot buy and sell AlertsMise a jour avec un EMA 20/50 et vwap
his script is a composite indicator for TradingView (Pine Script v5) that merges Smart Money Concepts (SMC) with a Dual-instance UT Bot. It has been styled with a high-contrast "Neon Cyberpunk" theme (Cyan/Pink) and is fully compliant with the CC BY-NC-SA 4.0 license.
Here is a breakdown of its two main components:
1. Smart Money Concepts (SMC)
This portion, originally by LuxAlgo, is designed to identify institutional price levels and structural market shifts. It provides a detailed map of market structure rather than simple entry/exit signals.
Market Structure (BOS & CHoCH):
BOS (Break of Structure): Marks trend continuation (e.g., breaking a higher high in an uptrend).
CHoCH (Change of Character): Marks potential trend reversals (e.g., the first time a higher low is broken in an uptrend).
Order Blocks (OB):
Highlights specific candles where institutional buying or selling likely occurred. These act as high-probability support/resistance zones.
Neon Blue/Cyan for Bullish OBs.
Neon Pink for Bearish OBs.
Fair Value Gaps (FVG):
Identifies imbalances (gaps) in price action where the market often returns to "fill" orders.
Neon Mint for Bullish FVGs.
Neon Red for Bearish FVGs.
Premium/Discount Zones: Automatically plots the range equilibrium (50% level) to help you buy in "Discount" (low) and sell in "Premium" (high) areas.
Liquidity (EQH/EQL): Automatically detects "Equal Highs" and "Equal Lows," which are magnets for price as they represent liquidity pools (stop losses).
2. Dual UT Bot Alerts
This portion provides the actual Entry Signals. It runs two separate instances of the "UT Bot" strategy simultaneously with different sensitivity settings to filter noise.
Instance 1 (Buy Only):
Settings: Key Value = 4, ATR Period = 10 (Faster, more sensitive).
Visual: Plots a Neon Cyan "Buy" label.
Function: Looks for bullish reversals earlier to catch the start of a move.
Instance 2 (Sell Only):
Settings: Key Value = 7, ATR Period = 20 (Slower, smoother).
Visual: Plots a Neon Pink "Sell" label.
Function: Uses a wider ATR band to avoid getting shaken out of shorts too early, focusing on major downtrends.
How to Use It
The strength of this script is confluence.
Wait for a Signal: Look for a UT Bot "Buy" or "Sell" tag.
Confirm with SMC: Check if the signal aligns with SMC concepts.
Example Buy: Did the UT Bot give a "Buy" signal while price was bouncing off a Bullish Order Block?
Example Buy: Did price just sweep Liquidity (EQL) before the Buy signal?
Example Sell: Is the "Sell" signal happening inside a Premium Zone or a Bearish Fair Value Gap?
avant-hier
Notes de version
1. "Pro" Badge Buy/Sell Labels
The standard text signals have been replaced with modern, professional Badge Labels that provide more information at a glance.
Visuals: Instead of simple text, the script now uses label.new to create high-visibility badges.
BUY: A Neon Cyan badge with a Rocket icon (🚀).
SELL: A Neon Pink badge with a Chart icon (📉).
Price Details: Each badge displays the exact Entry Price directly on the label.
Tooltips: If you hover your mouse over a Buy or Sell badge, a tooltip will appear showing the exact Take Profit (TP) and Stop Loss (SL) prices calculated for that trade.
2. Dynamic Take Profit (TP)
The script now automatically calculates a profit target for every trade the moment a signal is generated.
Calculation: It measures the distance between your Entry Price and the initial Stop Loss (the ATR Trailing Stop).
Risk:Reward: It multiplies that distance by your chosen Risk:Reward Ratio (default is 1.5) to project a TP target.
Visual Line: A Green Line is drawn on the chart at the TP level. It remains active until price hits it or the stop loss.
3. Active Trailing Stop Loss (SL)
The Stop Loss is no longer static; it is now "alive" and manages the trade for you.
Trailing Logic: If Use Trailing SL? is enabled (default), the SL line will automatically move up (for longs) or move down (for shorts) as the trend continues in your favor. It locks in profit by following the UT Bot's ATR trailing band.
Visual Line: A Red Line is drawn at the SL level. You can see it physically step up or down on the chart as the trend progresses.
4. Real-Time Trade Simulation
The script now simulates the lifecycle of a trade directly on the chart:
Active State: When a trade is live, the TP and SL lines extend to the right of the current candle (bar_index + 1), showing you exactly where your exit points are in real-time.
Closed State: Once the price hits either the Green TP line or the Red SL line, the script detects the "Exit." The lines stop extending and turn dotted, indicating that the trade is closed and waiting for the next signal.
Summary of New Settings
You will find a new group in the settings panel called "UT Bot: Trade Management":
TP Risk:Reward Ratio: Adjust this to change how far the Green TP line is placed (e.g., set to 2.0 for 2x return).
Use Trailing SL?: Uncheck this if you want the Red SL line to stay fixed at the initial entry risk level.
avant-hier
Notes de version
1. Live Strategy Performance Dashboard (Backtester)
Since this is an indicator, TradingView does not automatically calculate PnL (Profit and Loss). I have built a custom Simulation Engine inside the script that tracks every UT Bot signal as if you had taken the trade.
Location: Bottom Right of your chart.
Win Rate: Displays the percentage of trades that hit the Take Profit target versus the Stop Loss.
Trades (W/L): Shows the total number of signals generated, broken down by Wins and Losses.
Net Profit (R): Calculates your theoretical profit in "R-Multiples" (Risk Units).
Example: If you set your Risk:Reward to 2.0, every win adds +2R, and every loss subtracts -1R.
Dynamic Colors: The Win Rate and Profit cells turn Neon Cyan if positive (>50% or >0R) and Neon Pink if negative.
2. Multi-Timeframe Trend Dashboard
A new panel at the Top Right gives you an instant "Market Bias" reading so you don't have to scan the whole chart.
SMC Trend: Reads the Smart Money structure (Break of Structure/Change of Character) to determine if the high-level timeframe is BULLISH or BEARISH.
UT Bot Status: Displays the current active signal state:
BUY (Active): You are currently in a Long trade.
SELL (Active): You are currently in a Short trade.
NEUTRAL: No active signal or the last trade hit TP/SL.
3. Integrated Alert System
I have connected the visual lines to the alert system. You can now set a single alert on this indicator, and it will trigger for:
Entry Signals: "UT Long Entry" / "UT Short Entry"
Exits: "Take Profit Hit" / "Stop Loss Hit"
4. Consolidated Settings
To make the script easier to manage, I organized the settings into clear groups:
Dashboards: Toggle the visibility of the new panels or move the Performance Panel to a different corner.
UT Bot: Trade Management: Quickly adjust your Risk:Reward Ratio (e.g., change from 1.5 to 2.0) to see how it affects your Win Rate in real-time on the dashboard.
avant-hier
Notes de version
1. Multi-Timeframe (MTF) Trend Scanner
I have replaced the basic "Market Bias" panel with a comprehensive MTF Trend Dashboard located at the Top Right of your chart.
What it tracks: It simultaneously monitors the trend direction on 5 distinct timeframes:
15 Minute
1 Hour
4 Hour
Daily
Weekly
How it works: It runs a background calculation (using UT Bot settings Key=5, ATR=15) on these higher timeframes without you needing to switch charts.
Visuals:
BULLISH: Highlighted in Neon Cyan.
BEARISH: Highlighted in Neon Pink.
2. Strategic Confluence (How to use it)
This new dashboard transforms the script from a simple "signal generator" into a complete trading system by allowing you to filter trades based on the bigger picture.
The "All-Green" Rule: If you are scalping on a 5-minute chart and you get a BUY signal, check the dashboard. If the 1H, 4H, and Daily are all Neon Cyan (Bullish), that trade has a significantly higher probability of success.
Avoid Counter-Trend Trades: If your main chart says BUY, but the dashboard shows the 4H and Daily are Neon Pink (Bearish), you are trading against the major trend. You might want to skip that trade or reduce your risk size.
3. Summary of Dashboards
You now have two professional-grade panels on your screen:
Bottom Right (Performance): Shows the past results of the strategy on your current timeframe (Win Rate, Profit Factor).
Top Right (Trend): Shows the current state of the market across all timeframes.

COMBO: LuxAlgo SFP + EXTREMOS + VWAP 3rd Band + LG (15m)This is the best indicator 1h chart
High and low points daily

Elliott Wave Pattern AnalyzerElliott Wave Pattern Analyzer
Overview
This indicator automatically detects Elliott Wave impulse patterns and diagonal formations on your chart. It analyzes price structure based on classic Elliott Wave rules and displays wave counts with confidence scores, Fibonacci projections, and invalidation levels.
Why I Built This
After reading Glenn Neely's book on Elliott Wave theory, I wanted to put my learning into practice by building something tangible. There's no better way to understand a concept than trying to code it!
I'll be honest – corrective wave patterns (zigzags, flats, triangles, combinations) were simply too complex for me to implement reliably. So instead, I focused on what I could manage: impulse waves and diagonal patterns. Maybe someday I'll tackle the corrections, but for now, this is my humble contribution.
The retracement visualization style was inspired by LuxAlgo's elegant approach – credit where credit is due!
How It Works
1. Wave Detection
The indicator uses pivot points to identify potential 5-wave structures:
WaveRuleWave 2Cannot retrace more than 100% of Wave 1Wave 3Cannot be the shortest among Waves 1, 3, 5Wave 4Should not overlap Wave 1 territory (impulse)Wave 5Completes the motive structure
2. Pattern Types
Impulse Waves
Classic 5-wave motive structure
Wave 3 typically extends (≥1.618 of Wave 1)
Strict mode enforces all Elliott rules
Diagonal Patterns
Ending diagonal (wedge-shaped)
Waves progressively contract
Lines 1-3 and 2-4 converge to an apex
Often signals trend exhaustion
3. Confidence Scoring
Each pattern receives a confidence score (0-100%) based on:
Fibonacci ratio adherence
Wave proportion relationships
Rule compliance
Structural clarity
Only patterns exceeding your threshold (default: 60%) are displayed.
4. Fibonacci Projections
After Wave 5 completion, the indicator projects potential retracement levels:
0.382, 0.500, 0.618, 0.786 of the entire impulse
5. Extension Channel
Connects Wave 0 origin to the retracement low, projecting:
0.618, 1.000, 1.272, 1.618 extensions
Optional extended levels: 2.000, 2.618, 4.236
6. Invalidation Levels
Shows the price level where the wave count becomes invalid – helping you know when your analysis is wrong.
Settings Explained
Impulse Wave Settings
Pivot Length: Sensitivity of wave detection (recommended: 5, 7, 14)
Strict Mode: Enforce all classic Elliott rules
Min Wave 3 Extension: Minimum ratio for Wave 3 (default: 1.618)
Diagonal Wave Settings
Allow Wave 4-1 Overlap: Required for valid diagonals
Extend Trendline: Project diagonal boundaries forward
Projection Settings
Fibonacci Levels: Customize retracement targets
Extension Bars: How far projections extend on chart
Pattern Management
Max Patterns: Limit displayed patterns to reduce clutter
Pattern Lifetime: Auto-remove old patterns after X bars
Use Cases
Trend Trading: Enter on Wave 3 or Wave 5 breakouts
Reversal Spotting: Diagonal completion often signals reversals
Target Setting: Use Fibonacci extensions for take-profit levels
Risk Management: Invalidation levels provide clear stop-loss references
Notes
This indicator uses pivot detection and may repaint – signals are confirmed after the specified pivot length
Designed for educational and analytical purposes, not as a signal generator
Elliott Wave analysis is subjective – this is my algorithmic interpretation
Works best on liquid markets with clear trend structure
Not financial advice – always do your own research
Re-publishing Notice
This indicator was previously blocked due to some house rule violations on my part. I've recently had time to review and fix those issues, and I'm now re-publishing a compliant version. Thanks for your patience!
Feedback Welcome
I'm still learning Elliott Wave theory myself, so if you spot any issues or have suggestions for improvement, please leave a comment. Let's learn together!
Happy trading! 📈

NY Opening Range [LuckyAlgo]
This custom ORM (Opening Range Move) indicator is designed as a tool for traders who focus not just on where a range is, but on the magnitude of the expansion following the initial morning volatility.
Here is a summary of the indicator and how it differentiates itself from standard Opening Range Breakout (ORB) tools.
Indicator Summary
The script captures the high and low of the market during the first 30 minutes of the NY session (09:30–10:00 AM EST). Once this range is set, it tracks the "Expansion Move" - the point distance from the range's boundary to the current session's high or low. It visualizes this through color-coded zones, dynamic labels at the session extremes, and a statistical table that benchmarks today's volatility against the recent past.
What specific questions does this indicator answer?
While most indicators tell you "the range is broken," this indicator answers quantitative questions vital for trade management:
1. "How far has the market stretched relative to the breakout?"
The indicator provides the exact point distance (+/-) from the range high/low. This helps you determine if the move is just beginning or if it has already extended significantly.
2. "Is the current move 'normal' or an outlier?"
By using the Stats Table, you can see if the current 40-point move on NQ is typical or if the average move over the last 10 days is actually 80 points. This prevents you from "fading" a move that still has average room to grow, or taking a "pro-trend" trade when the market is already exhausted.
3. "Where is the session extreme located?"
The inclusion of the dashed High of Day (HOD) and Low of Day (LOD) lines with attached labels tells you exactly where the "Move" calculation is peaking. If the HOD line hasn't moved for two hours, you know the bullish expansion has stalled.
4. "When is the data no longer relevant?"
Because of the 17:00 EST reset logic, the indicator answers the "end of day" question for futures traders. It stops measuring at the settlement/close of the electronic session, ensuring your charts are clean for the overnight (Globex) session or ready for the next morning.
Technical Advantage
Most scripts use a single "point in time" to reset. This script uses a Trading Window logic, which is much more robust. If a bar is missing at exactly 17:00 due to low volume or a data glitch, the indicator won't "break" or keep drawing old lines - it understands the entire window of time it is allowed to exist in.
Credit to @LuxAlgo for his initial Opening Range Breakout indicator used as a base to develop this version.

Apex Trend & Liquidity Master V2.1The Apex Trend & Liquidity Master is a hybrid trading system designed to align traders with the dominant market trend while identifying key structural price levels. Unlike simple moving average crossovers or standalone support/resistance tools, this script integrates a volatility-adaptive "Trend Cloud" with a "Smart Liquidity" engine.
This integration allows the script to offer unique filtering capabilities, such as hiding counter-trend liquidity zones to reduce chart noise and focus on high-probability continuations.
How It Works
Adaptive Trend Cloud The backbone of the system is the Trend Cloud, calculated using a Hull Moving Average (HMA) base with ATR bands. The cloud expands and contracts based on market volatility.
Green Cloud: Bullish Regime. The market is trending up; look for long opportunities.
Red Cloud: Bearish Regime. The market is trending down; look for short opportunities.
Smart Liquidity Zones (with Integration) The script automatically detects Pivot Highs and Lows to draw Supply (Resistance) and Demand (Support) zones. These zones persist until price breaks through them (mitigation).
Integration Feature: A "Filter Zones by Trend" option is included in the settings. When enabled, this feature connects the Trend Cloud to the Liquidity Engine:
It will only display Demand zones when the Trend Cloud is Bullish.
It will only display Supply zones when the Trend Cloud is Bearish.
Note on Lag: Zones are based on pivots (default lookback: 10). A zone appears on the chart 10 bars after the pivot forms. These are historical structural levels.
Signal Filters Buy and Sell labels are generated when the Trend Cloud changes color, but they are filtered to ensure quality:
Volume Filter: Signals only appear if the current volume is higher than the 20-period average.
RSI Filter: Prevents buying when RSI is overbought (>70) or selling when oversold (<30).
Live HUD An on-chart dashboard provides real-time data on:
Trend Bias: Direction of the cloud.
Momentum: RSI strength (Weak/Neutral/Strong).
Volume: High vs. Low activity.
Usage Guide
Identify the Trend: Use the background fill color to determine if you should be looking for longs (Green) or shorts (Red).
Wait for Structure: Look for price to pull back into a "Smart Liquidity" zone. For example, in a Green Trend, wait for price to touch a Green Demand box.
Confirm with Momentum: Check the Dashboard. Ideally, you want to see "Strong" momentum aligning with your trade direction.
Settings: If the chart is too cluttered, enable "Filter Zones by Trend" in the settings menu to hide counter-trend boxes.
Credits & Attribution This script combines original integration logic with adapted open-source concepts:
Smart Liquidity Logic: The method for generating Supply/Demand boxes via Pivot Highs/Lows and array management is adapted from open-source logic commonly used in Smart Money Concepts (SMC) indicators, notably popularized by LuxAlgo and the broader Pine community.
Trend Logic: The volatility cloud utilizes standard Hull Moving Average (HMA) and ATR formulas.
Disclaimer This indicator is provided for educational and informational purposes only. It does not constitute financial advice. Past performance of pivot levels or trend signals does not guarantee future results.

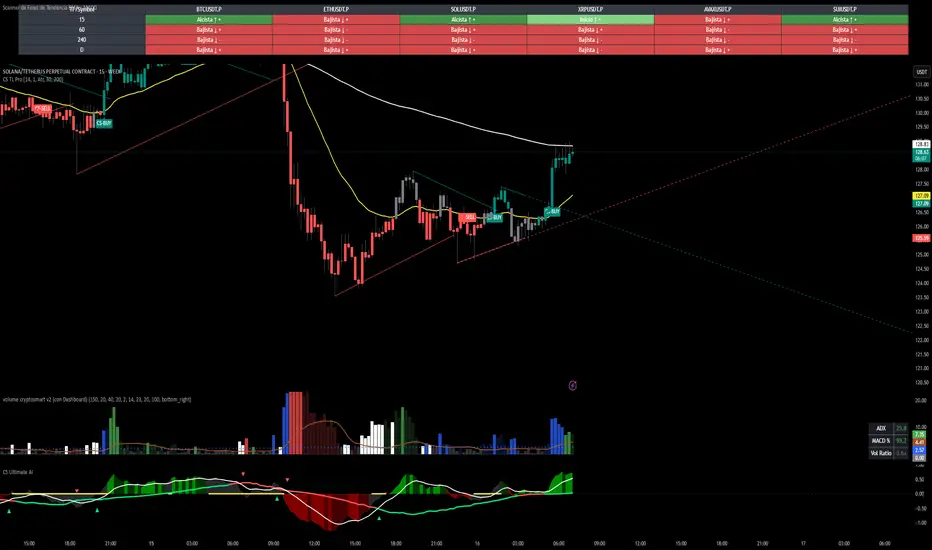
CS Trendline ProTitle: CS Trendline Pro
Description:
CS Trendline Pro is a comprehensive scalping and day-trading system designed to filter out noise and identify high-probability breakout setups. It combines the structural precision of Fractal Trendlines with a robust Dual-EMA Filter, visualized through an intuitive "Traffic Light" color system.
This tool is specifically engineered for traders who want to trade Trendline Breakouts but need a safety mechanism to avoid false signals (fakeouts) and counter-trend traps.
🚦 How the "Traffic Light" Logic Works
The core feature of this script is the dynamic coloring of the candles, which acts as a visual filter for your entries:
🟢 GREEN Zone (Safe Buy):
Condition: A Bullish Trendline Breakout has occurred AND the price is holding ABOVE the EMA 30 (Yellow Line).
Meaning: Momentum is bullish, and you are in a safe zone to look for Long entries.
🔴 RED Zone (Safe Sell):
Condition: A Bearish Trendline Breakout has occurred AND the price is holding BELOW the EMA 30 (Yellow Line).
Meaning: Momentum is bearish, and you are in a safe zone to look for Short entries.
⚪ GRAY Zone (No Trade / Wait):
Condition: A breakout occurred, but the price is on the "wrong side" of the EMA 30.
Meaning: Indecision. The market structure is conflicting with the immediate momentum. It is recommended to stay out until the color changes.
🛠️ Key Features
** automated Trendlines:** Automatically draws Support and Resistance dynamic trendlines based on pivot points (LuxAlgo engine).
Dual EMA Filter:
EMA 30 (Yellow): Acts as the immediate "Safe Zone" filter.
EMA 200 (White): Displays the macro trend. (Pro Tip: Only take Green signals if price is above the White line).
CS-BUY / CS-SELL Labels: Clear text markers appear exactly when a valid breakout occurs.
Customizable: Adjustable sensitivity (Length), EMA periods, and Slope calculation methods (ATR, Stdev, Linreg).
📉 How to Trade with CS Trendline Pro
For Scalping (5m / 15m):
Identify the Main Trend: Look at the White EMA (200).
If Price > EMA 200 → Focus on BUY signals.
If Price < EMA 200 → Focus on SELL signals.
Wait for the Signal:
Wait for the candle to turn Teal (Green) or Red.
Ensure the candle closes with the new color.
Risk Management:
Place Stop Loss below the recent swing low (for buys) or above the swing high (for sells).
Target a 1.5 Risk/Reward ratio or trail your stop using the EMA 30.
⚠️ Important Note on Backpainting
This indicator uses pivot points to draw trendlines. By nature, a pivot point can only be confirmed after a few bars have passed (Lag).
Backpaint Setting (Default ON): Keeps your historical chart clean by connecting the exact pivot points in the past.
Real-Time Behavior: In live trading, the trendline and signal will appear once the pivot is confirmed (based on your 'Length' setting). This is normal behavior for any trendline script.
Settings Recommended:
5-Minute Chart: Length 10 or 14.
15-Minute Chart: Length 14.
Enjoy trading with precision! ~ CS Trading
Simple ICT Sweep + FVG (LuxAlgo Swings FIXED)something i created if anyone can improve it or change for better visual

TRZigZagLibLibrary "TRZigZagLib"
method directionName(this)
Gets pivot direction as string
Namespace types: Pivot
Parameters:
this (Pivot) : Pivot instance
Returns: "HIGH" or "LOW"
method isHigh(this)
Checks if pivot is a high
Namespace types: Pivot
Parameters:
this (Pivot) : Pivot instance
Returns: true if pivot is a high
method isLow(this)
Checks if pivot is a low
Namespace types: Pivot
Parameters:
this (Pivot) : Pivot instance
Returns: true if pivot is a low
method newSettings(minLength, minBarSize, maxBarSize)
Creates default ZigZag settings
Namespace types: series int, simple int, input int, const int
Parameters:
minLength (int) : Minimum pivot length (default: 10)
minBarSize (int) : Minimum bars between pivots (default: 5)
maxBarSize (int) : Maximum bars to lookback (default: 300)
Returns: New ZigZagSettings instance
method setLineStyle(this, lineColor, lineWidth, lineStyle)
Sets line appearance
Namespace types: ZigZagSettings
Parameters:
this (ZigZagSettings) : Settings instance
lineColor (color)
lineWidth (int)
lineStyle (string)
Returns: Modified settings instance
method newZigZag(settings, depth)
Creates a new ZigZag instance
Namespace types: ZigZagSettings
Parameters:
settings (ZigZagSettings) : ZigZag settings
depth (int) : Depth value for this ZigZag
Returns: New ZigZag instance
method calculate(this)
Calculates ZigZag using LuxAlgo-style pivot detection
Namespace types: ZigZag
Parameters:
this (ZigZag) : ZigZag instance
method getLastPivots(this, count)
Gets the last N pivots
Namespace types: ZigZag
Parameters:
this (ZigZag) : ZigZag instance
count (int) : Number of pivots to get (default: 5)
Returns: Array of pivots
method getPivot(this, index)
Gets pivot at index
Namespace types: ZigZag
Parameters:
this (ZigZag) : ZigZag instance
index (int) : Index (0 = most recent)
Returns: Pivot or na
method truncate(this, maxBars)
Truncates old pivots beyond lookback window
Namespace types: ZigZag
Parameters:
this (ZigZag) : ZigZag instance
maxBars (int) : Maximum bars to keep
method newMultiZigZag(settings, minDepth, maxDepth, count)
Creates a new MultiZigZag manager
Namespace types: ZigZagSettings
Parameters:
settings (ZigZagSettings) : Base settings for all ZigZags
minDepth (int) : Minimum depth value
maxDepth (int) : Maximum depth value
count (int) : Number of ZigZag instances (max 11)
Returns: New MultiZigZag instance
method calculateAll(this)
Updates all ZigZag instances
Namespace types: MultiZigZag
Parameters:
this (MultiZigZag) : MultiZigZag instance
method getZigZag(this, index)
Gets ZigZag at index
Namespace types: MultiZigZag
Parameters:
this (MultiZigZag) : MultiZigZag instance
index (int) : Index (0 to count-1)
Returns: ZigZag instance or na
method getDepth(this, index)
Gets depth value at index
Namespace types: MultiZigZag
Parameters:
this (MultiZigZag) : MultiZigZag instance
index (int) : Index (0 to count-1)
Returns: Depth value
method size(this)
Gets total number of ZigZag instances
Namespace types: MultiZigZag
Parameters:
this (MultiZigZag) : MultiZigZag instance
Returns: Count of ZigZag instances
method truncateAll(this, maxBars)
Truncates all ZigZag instances
Namespace types: MultiZigZag
Parameters:
this (MultiZigZag) : MultiZigZag instance
maxBars (int) : Maximum bars to keep
method distance(p1, p2)
Calculates distance between two pivots
Namespace types: Pivot
Parameters:
p1 (Pivot) : First pivot
p2 (Pivot) : Second pivot
Returns: Price distance (absolute)
method barSpan(p1, p2)
Calculates bar span between two pivots
Namespace types: Pivot
Parameters:
p1 (Pivot) : First pivot
p2 (Pivot) : Second pivot
Returns: Bar span (absolute)
method isAlternating(pivots)
Checks if pivots are alternating (high-low-high or low-high-low)
Namespace types: array
Parameters:
pivots (array) : Array of pivots
Returns: true if alternating pattern exists
Pivot
Pivot point in the chart
Fields:
d (series int) : Direction: 1=high, -1=low
x (series int) : Bar index
y (series float) : Price
confirmed (series bool) : Pivot confirmation flag
ZigZagSettings
ZigZag configuration settings
Fields:
minLength (series int) : Minimum pivot detection length
minBarSize (series int) : Minimum bars between pivots
maxBarSize (series int) : Maximum bars to lookback
lineColor (series color) : ZigZag line color
lineWidth (series int) : ZigZag line width
lineStyle (series string) : ZigZag line style
ZigZag
Single ZigZag instance
Fields:
settings (ZigZagSettings) : Configuration settings
pivots (array) : Array of pivot points (max 25 for patterns)
lastUpdateBar (series int) : Last bar index when updated
depth (series int) : Current depth value
MultiZigZag
Multi-depth ZigZag manager
Fields:
zigzags (array) : Array of ZigZag instances (max 11)
depthValues (array) : Array of depth values being used
currentBar (series int) : Current bar index being processed

SYXX - HTF Candle Overlay
This script, titled "HTF Candle Overlay by SYXX," is designed to visualize the full range and structure of a higher-timeframe (HTF) candle directly onto a lower-timeframe chart. It helps traders maintain context by showing where the current price action sits relative to a much larger candle's boundaries. Combined with LuxAlgo Volume Node Profile.
1. 🔍 Primary Feature: Higher Timeframe Candle Projection
Configurable Timeframe: The user sets the desired HTF using the Interval input, which defaults to 'D' (Daily). The indicator then tracks the High, Low, Open, and Close of that HTF bar.
Live and Historical Drawing: The script uses box.new to draw boxes representing the candle's full range (High to Low).
Historical Boxes (if changeHTF): When a new HTF candle closes, the completed box for the previous period is drawn.
Live Box (if barstate.islast): The indicator draws a live, dynamic box for the current, incomplete HTF candle, which expands with every new High or Low on the lower chart.
2. 🎨 Visualization & Customization
Color-Coded Bias: The boxes are colored based on the HTF candle's direction:
Bullish/Long (BgLong): Green color is used if the HTF candle closed higher than it opened (close > htfOpen).
Bearish/Short (BgShort): Red color is used if the HTF candle closed lower than it opened.
Box Styling: Users can customize the box's appearance, including border color and style, border thickness, and background opacity (BoxOpacity).
Midline: An optional MidLine is calculated as the average of the HTF High and Low, acting as a potential support/resistance reference point.
Range Display: The indicator can display the range of the box in pips (BoxRangePips) or the percentage of movement relative to the full range (BoxRangePercentage).
Time Labels: It plots time labels that show the start and end time of the completed HTF period (e.g., "07:00 - 11:00").
3. 🚨 Alert System (Placeholders)
The script includes placeholder inputs for standard trading alerts, though the internal logic for checking these conditions is currently commented out or set to false:
Alert: Break Above/Below Box: To signal a breakout of the HTF High or Low.
Alert: Price Re-Enters Box: To signal a pullback back into the range.

Morning ORB FVG Trigger✅ Overview
Morning ORB FVG Trigger is a complete intraday trading framework built around:
A Morning Opening Range Breakout (ORB)
The first Fair Value Gap (FVG) after that breakout
Strict risk management and position sizing
Optional HTF trend filter (Daily / Weekly / Monthly)
Optional Daily ATR filter to avoid extreme days
The script is designed for futures / indices / FX on intraday charts up to 15 minutes and for traders who want a clean, mechanical entry framework with clear risk.
🧠 Core idea
Define a morning opening range (e.g. 09:30–09:45).
Wait for a clean breakout above/below that range.
After the breakout, wait for the first FVG in breakout direction,
confirmed by the next candle (no immediate full reclaim).
Use a chosen stop logic + R:R factor to build risk/reward boxes.
Calculate position size based on your account risk.
(Optional) Only take trades:
In the direction of the HTF EMA trend (D/W/M).
On days where the morning range is within a band of the Daily ATR.
You can also disable all signals/boxes and use the script just as a visual ORB tool.
⏰ 1. ORB / Morning Range
Inputs (Main section)
Morning Range Session
Time window of the opening range in exchange time
Example: 09:30–09:45 for a 15-minute ORB.
You can type custom ranges (e.g. 09:30–09:35 for a 5-minute ORB).
Risk/Reward (TP factor)
Multiplier for the take-profit distance relative to the stop.
2.0 = TP is 2× the stop distance
1.5 = TP is 1.5× the stop distance
Show ORB range
If enabled, draws:
ORB high/low lines
ORB labels (e.g. 15min ORB high / low)
Optional midline
Extend ORB lines to the right (bars)
How many bars to extend the ORB high/low horizontally beyond the ORB itself.
Trade box width (bars)
Horizontal width (in bars) of:
Red risk box (entry–stop)
Green reward box (entry–TP)
Implementation details
The ORB is always calculated on 1-minute data internally, so it stays precise even on 5m/15m charts.
The script only works on intraday timeframes up to 15 minutes.
📦 2. FVG Block
Group: “FVG”
Threshold %
Minimum size of an FVG in % of price.
0 = every FVG
Higher values = only larger gaps
Auto threshold (from volatility)
If enabled, the minimum FVG size is derived from historical volatility
instead of a fixed percentage.
Allow breakout FVG partly inside ORB
Off (default): the FVG must lie fully outside the ORB.
On: the breakout FVG itself may still overlap the ORB a bit,
as long as it is the first one attached to the breakout move.
Enable FVG entry signals, boxes & alerts
On: full system – FVG detection, entry labels, risk/TP boxes, alerts.
Off: no entries, no risk/TP boxes, no alerts.
You only get the ORB and (optionally) the HTF dashboard, so you can trade your own setups.
Entry mode
Entry mode (Mid / Edge / NextOpen)
Mid – Entry at the midpoint of the FVG.
Edge – Long at the upper FVG edge, short at the lower FVG edge.
NextOpen – No limit order in the gap. Entry is placed at the next bar open after FVG confirmation.
Edge offset (ticks)
Additional offset for Edge entries:
Long:
+ticks = a bit above the FVG (more conservative)
-ticks = deeper into the FVG (more aggressive)
Short:
+ticks = a bit below the FVG
-ticks = deeper into the FVG
FVG detection logic
Uses a LuxAlgo-style 3-candle FVG pattern (gap between candle 1 and 3).
Only one FVG is taken: the first valid FVG after the ORB breakout in breakup direction.
The FVG candle is the middle bar; the script:
Detects the FVG on the previous bar.
Waits for the current bar to confirm it:
Bullish: current low must stay above the lower FVG boundary
Bearish: current high must stay below the upper FVG boundary
Only then an entry signal is generated.
🛑 3. Stop Logic
Group: “Stop Logic”
Stop mode (PrevBar / Pivot / FVG Candle)
PrevBar – Stop at the low/high of the candle before the FVG
(tight/aggressive).
FVG Candle – Stop at the low/high of the FVG candle itself
(medium).
Pivot – Stop at the most recent swing high/low
using pivotLeft / pivotRight pivots (more conservative).
Ticks (stop buffer)
Offset (in ticks) from the selected stop level.
> 0 = further away (more room, more risk)
< 0 = closer (tighter stop)
Pivot left / Pivot right
Number of candles left/right to define a swing high/low
when using Pivot stop mode.
Typical intraday values: 2–3.
The script also sanity-checks the stop:
if the calculated stop would be invalid (e.g. above entry in a long), it moves it by a minimal distance (2 ticks) to keep a valid risk.
📈 4. HTF Trend Filter (Daily / Weekly / Monthly)
Group: “HTF Trend Filter”
Enable HTF trend filter
If enabled, trades are only allowed:
Long when at least 2 of D/W/M closes are above their EMA
Short when at least 2 of D/W/M closes are below their EMA
EMA length (D/W/M)
EMA length for all three higher timeframes (Daily, Weekly, Monthly).
This helps focus entries in the direction of the dominant higher-timeframe trend.
📊 5. ATR Filter (Daily)
Group: “ATR Filter (Daily)”
Use daily ATR filter
If enabled, the height of the ORB (ORB high – ORB low) must be within
a band of the Daily ATR to allow any signals.
Daily ATR length
ATR period on the Daily timeframe.
Min ORB size vs ATR
Lower bound:
Example: 0.3 → ORB must be at least 0.3 × Daily ATR
0.0 = no minimum.
Max ORB size vs ATR
Upper bound:
Example: 1.5 → ORB must be ≤ 1.5 × Daily ATR
0.0 = no maximum.
If the ORB is too small (choppy) or too large (exhausted move), no breakout or FVG signal will be generated on that day.
🧭 6. HTF Dashboard & Signal Labels
Group: “HTF Trend Dashboard”
Show HTF dashboard
Draws a small label at the top of the chart showing:
HTF Trend (EMA X)
D: UP/FLAT/DOWN
W: UP/FLAT/DOWN
M: UP/FLAT/DOWN
Dashboard position
Top Right, Top Center, Top Left – places the dashboard at the top.
Over Risk Info – no top dashboard; instead, the HTF trend info is shown as a label near the risk box when a new signal appears.
Lookback (bars) for top anchor
How many bars to use to determine the top price level for dashboard placement.
Show HTF trend above risk box on signal
Only relevant if Dashboard position = Over Risk Info.
When enabled, a small HTF label appears near the risk box for each new trade.
Signal label vertical offset (ticks)
Vertical spacing between risk info label and HTF label.
Minimum spacing HTF/Risk (ticks)
Ensures a minimum vertical distance so the two labels don’t overlap.
HTF signal label X offset (bars)
Horizontal offset (left/right) relative to the risk info label.
⏳ 7. ORB–FVG Filters (Session & Time Window)
Group: “ORB FVG Filter”
Only same session day
If enabled, FVG entries are only allowed on the same calendar day
as the ORB. When the date changes, all state & drawings are reset.
Limit hours after ORB
Enables a time window after the ORB end.
Trading window after ORB (hours)
Length of that window in hours.
Example: 2.0 → FVG signals only in the first 2 hours after ORB end.
💰 8. Risk Management & Position Sizing
Group: “Risk Management”
Calculate position size
If enabled, the script computes suggested mini and micro contract size for you.
Account size
Your trading account size (in account currency).
Risk mode
Percent – risk is a % of account size (Account risk %).
Fixed amount – risk is a fixed dollar amount (Fixed risk ($)).
Account risk %
Risk per trade as a percentage of account size (e.g. 1.0 for 1%).
Fixed risk ($)
Fixed risk per trade in dollars when using Fixed amount mode.
Micro factor (vs mini)
How much a micro contract is worth relative to a mini.
Example:
0.1 → one micro moves 1/10 of one mini.
Risk Info label
For each new trade, a label is shown above the boxes with:
Stop distance in price and $ risk per mini
Max risk allowed for the trade
Suggested mini and micro size
Text like:
Suggested: 2 mini
Suggested: 5 micro
or Suggested: no trade
This makes the script especially useful for prop-firm rules or strict risk discipline.
🎨 9. Visual Style (Boxes, Labels, ORB Lines)
Group: “Box & Label Style (Trade)”
Label font size (Very small, Small, Normal, Large)
Entry label BG / text color
Stop label BG / text color
TP label BG / text color
Risk info BG / text color
Risk box color (entry–stop zone)
Reward box color (entry–TP zone)
Group: “ORB Style”
ORB high line color
ORB low line color
ORB line width
ORB label font size
ORB label background color
ORB label text color
Show ORB midline
ORB midline color / width / style (Solid / Dashed / Dotted)
⚠️ 10. Alerts
Group: “Alerts”
The script defines three alert conditions:
Long entry FVG breakout
Triggered when a new long signal appears.
Short entry FVG breakout
Triggered when a new short signal appears.
FVG entry (long/short)
Generic alert for any new signal (long or short).
To use them:
Add the indicator to the chart.
Open the Alerts dialog → “Condition”.
Select this script and one of the alert conditions.
Set your preferred expiration and notification settings.
Alerts only fire when Enable FVG entry signals, boxes & alerts is on.
🧩 11. How the trading logic flows (summary)
Build ORB on 1-minute data during the selected session.
Optionally reject the day if ORB is outside the ATR bounds.
Wait for a breakout (close above high or below low), respecting HTF trend filter.
After breakout, look for the first valid FVG in that direction:
Outside the ORB (unless breakout FVG allowed inside)
Confirmed by the next candle (no full reclaim)
Once confirmed:
Compute entry, stop, target.
Draw risk/reward boxes and all labels.
Optionally show HTF signal label over the risk info.
Trigger alerts if enabled.
If you disable FVG signals, only steps 1–3 (plus dashboard) are effectively active.
⚠️ 12. Notes & Disclaimer
Script is intended for intraday trading up to 15-minute timeframes.
All signals are mechanical and do not guarantee profitability.
Always backtest and forward-test on your own data before risking real money.
This script is for educational purposes only and is not financial advice.
🚀 Quick-start guide
Add the script to your chart
Use an intraday timeframe ≤ 15 minutes (1m, 3m, 5m, 15m).
Works best on liquid indices, futures, FX and large-cap stocks.
Set the Morning Range
In “Morning Range Session” choose the exchange’s opening window.
Examples
US index futures (CME): 08:30–08:45 or 08:30–08:35
US stocks (NYSE/Nasdaq): 09:30–09:45 or 09:30–09:35
The ORB is always calculated on 1-minute data internally, so the range stays accurate on higher intraday charts.
Keep the default filters at first
HTF Trend Filter: ON
EMA length = 20
This will only allow trades in the direction of the dominant D/W/M trend.
ATR Filter: OFF (optional; you can enable later once you’re comfortable).
Use the full trade system
In the FVG group leave
“Enable FVG entry signals, boxes & alerts” = ON
Entry mode: Mid
Stop mode: FVG Candle or PrevBar
Risk/Reward: 2.0 as a starting point.
Set your risk
Turn on “Calculate position size”.
Enter your Account size and choose either:
Risk mode = Percent (e.g. 1.0 = 1% per trade), or
Risk mode = Fixed amount (e.g. $250 per trade).
The risk info label will show:
Stop distance in price and $/contract
Max allowed risk
Suggested mini and micro contract size.
Enable alerts (optional)
Open the Alerts dialog → Condition: this script.
Choose one of:
Long entry FVG breakout
Short entry FVG breakout
FVG entry (long/short)
Choose “Once per bar” or “Once per bar close”, and your preferred notification type.
Replay & journal
Use the TradingView bar replay tool to step through past days.
Focus on:
How the ORB defines the structure.
How the first confirmed FVG outside the ORB behaves.
Whether the risk/TP levels fit your own style and product.
🎛 Recommended settings & profiles
These are starting points, not rules. Always adapt to the instrument and your own risk tolerance.
1. Conservative / Trend-following
Timeframe: 5m or 15m
Morning Range Session: 15-minute ORB around the cash or futures open
FVG
Threshold %: 0.05–0.1 (filter out very small gaps)
Auto threshold: OFF (keep it simple)
Allow breakout FVG partly inside ORB: OFF
Enable FVG entry signals/boxes/alerts: ON
Entry mode: Mid
Stop Logic
Stop mode: Pivot
Pivot left/right: 2–3
Stop buffer: +1–2 ticks
HTF Trend Filter
Enabled: ON
EMA length: 20
ATR Filter
Enabled: ON
Daily ATR length: 14
Min ORB vs ATR: 0.3–0.4
Max ORB vs ATR: 1.2–1.5
Risk Management
Risk mode: Percent
Account risk: 0.5–1.0%
Idea: Only trade when the higher-timeframe trend supports the move and the opening range is of a “normal” size for the current volatility.
2. Balanced / Intraday directional
Timeframe: 3m or 5m
FVG
Threshold %: 0.02–0.05
Auto threshold: ON (lets the script adapt to volatility)
Allow breakout FVG partly inside ORB: ON
(first breakout FVG may partly sit inside the ORB)
Entry mode: Edge
Edge offset (ticks): 0 or +1
Stop Logic
Stop mode: FVG Candle
Stop buffer: 0–1 ticks
HTF Trend Filter
Enabled: ON
ATR Filter
Enabled: OFF (optional)
Risk Management
Risk mode: Percent
Account risk: 1.0–1.5% (if this fits your plan)
Idea: Slightly more aggressive entries at the gap edge, still aligned with HTF trend, but with more flexibility on ATR.
3. Aggressive / Scalping around the ORB
Timeframe: 1m or 3m
FVG
Threshold %: 0.0–0.02
Auto threshold: ON
Allow breakout FVG partly inside ORB: ON
Entry mode: NextOpen or Edge with a negative offset (deeper into the gap)
Stop Logic
Stop mode: PrevBar
Stop buffer: 0 or -1 tick
HTF Trend Filter
Enabled: OFF (or ON but treat as soft guidance)
ATR Filter
Enabled: OFF
Risk Management
Risk mode: Percent
Account risk: lower, e.g. 0.25–0.5% per trade
Idea: More trades and tighter stops. Best for experienced traders who understand the limitations of scalping and whipsaw risk.
Final reminder
All of these are templates, not guarantees:
Always check how the system behaves on your market and session.
Start on replay and demo before trading real money.
Adjust filters (HTF, ATR, thresholds) until the signals fit your personal approach.

Smart Money Concepts [Dau_tu_hieu_goc]Credits to LuxAlgo for the SMC Parts.
Edited by Dau_Tu_Hieu_Goc

ITC Market Structure ProWith this tool you can see market structure, set session, daylow, dayhigh, multiple moving avg., fvg...
Every feature can by witched off or on to have more clarity watching price action - and everything is in one indicator, so you don't need to have stack off them!
Detailed description will try to provide later...
PS Thanks for LuxAlgo - I have use some of their fine work to combine all-in-one! Hoping it's not against the rules - if so, I will remove my tool.
PS Everything is rewritten to pine6
